Material Fuse ( Modeling )

Tool summary :

  • Combines materials that are touching and a part of the same member under a single submaterial mark. You select the materials to fuse.
  • Here's an example:

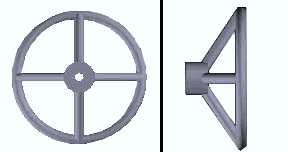
    This example of a standard part, a valve handle, was created in Modeling by fusing material.
  • Because the fused material receives a single single submaterial mark , it is listed on one line in the member bill of material.
  • The material type of a fused material is a standard part . Once materials have been fused, there is no way to unfuse them.
  • Step 3 lets you select the one material whose properties you want retained in the standard part.
  • See the step-by-step instructions .

Also see :

page 1 | contents | model > material > | model -- material | fit tools


   Step-by-step instructions :

Material Fuse can be used in Modeling . The following instructions assume that you are using a 3-button mouse.

1 . Before using this tool:

Make sure that the to-be-fused materials are displayed in a solid form and that all the materials are touching.

Make sure that the to-be-fused materials are all a part of the same member.

Decide before beginning this operation which material you want to select in step 3 . This is the material whose properties will be retained in the standard part.

2 . Invoke Material Fuse using any one (1) of the following methods:

Methods 1, 2 & 3 : Click the icon, or use a keyboard shortcut, or use the context menu. A Material Fuse icon can be added to your toolbar (classic) or ribbon (lightning). The icon, keyboard shortcut or context menu command can be found in the group named ' Model -- Material '. For lightning, Customize Interface is used to configure ribbons, keyboards, the context menu and modes.

Method 4 : If " Modeling layout style " is ' Classic ', you can use the menu system to choose Model > Material > Fuse .

Method 5 : With Material Fit Mode mouse bindings active, hold down the Shift key and middle-click ( Fuse ).

3 . The status line prompts, "Locate material to fuse to." Select - Pan - Menu mouse bindings become active (for Select One Item mode).

Select One Item bindings

3a : Left-click ( Select ) the material whose properties (steel grade, surface finish, etc.) you want retained in the standard part . It will be displayed in the User and Site Options > Modeling > " Primary selection color ."

4 . The status line prompts, " Locate material " and Select - Pan - Menu mouse bindings become active (for Select Item(s) mode). Note: You can only select materials that are submaterials of the member which the material you selected in step 3 is associated with.

Select Item(s) bindings

4a : Hold down the Shift key and left-click ( Select + ) each of the materials that you want to fuse to the material you selected in step 3. When all of the materials you want to fuse are selected (displayed in the User and Site Options > Modeling > " Secondary selection color "), press the Enter key or right-click ( Menu ) and choose " OK " on the menu .

5 . The status line prompts, "Verify standard part" and Yes - No mouse bindings become active.

bindings

Alternative 1 : Left-click ( Yes ) if you want these pieces of material to be fused and given a single minor mark.

Alternative 2 : Right-click ( No ) to end the Fuse Material operation and keep everything as it was before step 1.

6 . The mouse bindings that were active before you invoked Fuse Material again become active.

Tip: Do an Edit Material (double-click the material) and, on the General Information window, enter the " Description " you want to appear in the bill of material for the part you have created.

page 1 | contents | model > material > | model -- material | fit tools | top